Welcome to our step-by-step guide on how to set up and use the Galaxy Wallet app. In this guide, we will walk you through the entire process, from downloading the app to managing your digital assets. Whether you’re new to cryptocurrency or an experienced user, this guide is designed to help you get started with the Galaxy Wallet app and make the most out of its features.
Step 1: Downloading the App
To begin, visit the App Store or Google Play Store on your mobile device and search for “Galaxy Wallet.” Look for the official app developed by Galaxy Inc. and tap on the “Download” button to install it on your device.
Note: The Galaxy Wallet app is compatible with both iOS and Android devices.
Step 2: Creating Your Account
Once the app is installed, open it and select the option to “Create a New Account.” Provide the required information, including your email address, a strong password, and any other personal details that may be requested. Make sure to read and agree to the app’s terms and conditions.
Tip: We recommend using a unique and secure password to protect your account.
Step 3: Backing Up Your Wallet
After creating your account, the app will prompt you to back up your wallet. This involves creating a secure backup phrase or seed phrase, which consists of a series of words that can be used to restore your wallet in case you lose access to your device.
Important: Keep your backup phrase in a safe and secure place, preferably offline.
Step 4: Adding Digital Assets
Now that your account is set up and secured, it’s time to add digital assets to your Galaxy Wallet. Navigate to the “Add Assets” section of the app and choose from the list of supported cryptocurrencies. You may be required to provide additional information, such as wallet addresses, for certain assets.
Tip: You can always add or remove assets from your wallet later on.
Step 5: Managing Your Wallet
With your wallet set up and assets added, you can now manage your digital assets using the Galaxy Wallet app. This includes sending and receiving assets, checking your transaction history, and accessing additional features, such as staking or swapping assets. Explore the app’s user-friendly interface and discover all the tools and options available to you.
Note: Stay up to date with the latest app updates to ensure optimal performance and security.
That’s it! You have successfully set up and learned how to use the Galaxy Wallet app. Now you can enjoy the convenience and security of managing your digital assets on the go. Remember to always exercise caution and keep your private keys and backup phrase safe to protect your funds.
Step 1: Downloading Galxe Wallet App
To get started with the Galxe Wallet app, the first step is to download the app onto your device. The Galxe Wallet app is available for both Android and iOS devices, and it can be easily downloaded from the respective app stores.
If you have an Android device, you can download the Galxe Wallet app from the Google Play Store. Simply open the Play Store on your device, search for “Galxe Wallet,” and click on the “Install” button to download and install the app.
If you have an iOS device, you can download the Galxe Wallet app from the App Store. Open the App Store on your device, search for “Galxe Wallet,” and tap on the “Get” button to download and install the app.
Once the Galxe Wallet app is downloaded and installed on your device, you can proceed to the next step and set up your wallet.
Step 2: Setting Up Galxe Wallet App

Once you have downloaded and installed the Galxe Wallet app on your device, it’s time to set it up so you can start using it for your cryptocurrency transactions. Follow these steps to get started:
1. Open the Galxe Wallet app on your device.
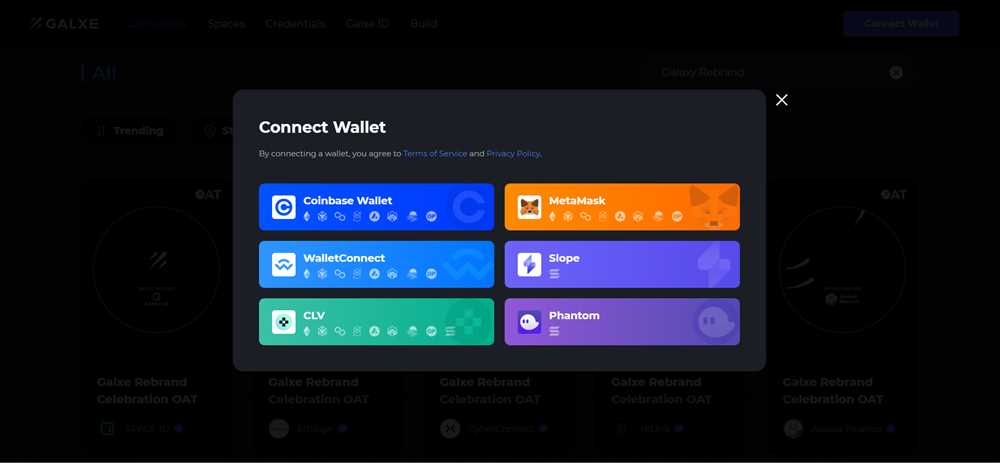
2. You will be prompted to create a new wallet or import an existing one. If you are a new user, choose the option to create a new wallet.
3. Set a strong password for your wallet. Make sure it is a combination of uppercase and lowercase letters, numbers, and special characters to enhance the security of your wallet.
4. Once you have set the password, you will be provided with a recovery phrase. This recovery phrase is crucial and serves as a backup, enabling you to restore your wallet in case of device loss or damage. Make sure to write it down and store it in a safe and secure place.
5. After writing down your recovery phrase, confirm it by entering the words in the correct order. This step ensures that you have correctly written down the recovery phrase and have a viable backup.
6. Once your recovery phrase is confirmed, your wallet will be successfully set up. You will now have access to your wallet’s main screen, which will display your account balance and other relevant information.
7. At this point, it is highly recommended to enable additional security features, such as biometric authentication or PIN code authentication, to further protect your wallet from unauthorized access.
Now that you have successfully set up your Galxe Wallet app, you can proceed to the next step, which involves adding cryptocurrency to your wallet and exploring its various features.
Step 3: Adding Funds to Galxe Wallet App
Once you have successfully set up your Galxe Wallet app, the next step is to add funds to your wallet. With funds in your wallet, you’ll be able to make transactions and use various services offered by Galxe Wallet.
Option 1: Linking a Bank Account
If you prefer to transfer funds directly from your bank account, you can link your bank account to your Galxe Wallet app. Here’s how:
- Open the Galxe Wallet app on your phone.
- Go to the settings menu and select “Add Bank Account.”
- Follow the prompts to enter your bank account details, such as your account number and routing number.
- Verify your bank account by following the verification process provided by Galxe Wallet.
- Once your bank account is linked and verified, you can transfer funds from your bank account to your Galxe Wallet app.
Option 2: Using a Credit Card
If you prefer to use a credit card to add funds to your Galxe Wallet app, you can do so by following these steps:
- Open the Galxe Wallet app on your phone.
- Go to the settings menu and select “Add Credit Card.”
- Enter your credit card details, such as the card number, expiration date, and CVV code.
- Verify your credit card by following the verification process provided by Galxe Wallet.
- Once your credit card is verified, you can use it to add funds to your Galxe Wallet app.
It’s important to note that Galxe Wallet may impose certain fees or limits when adding funds to your wallet. Be sure to check their terms and conditions for detailed information on fees and limits.
Step 4: Using Galxe Wallet App for Transactions
Once you have set up your Galxe Wallet app and added funds to your account, you can start using it for transactions. The Galxe Wallet app offers a user-friendly interface that makes it easy to send and receive cryptocurrencies.
To make a transaction, follow these steps:
1. Select the Cryptocurrency
On the main screen of the Galxe Wallet app, you will see a list of supported cryptocurrencies. Select the one you want to use for the transaction.
2. Enter the Recipient’s Address
Next, enter the recipient’s wallet address. Make sure you double-check the address to avoid any errors, as cryptocurrency transactions cannot be reversed.
3. Enter the Amount
Specify the amount of the cryptocurrency you want to send. The Galxe Wallet app will automatically calculate the equivalent value in your selected local currency.
4. Review the Transaction Details
Before confirming the transaction, carefully review the details, including the recipient’s address and the amount to be sent. Once you confirm the transaction, it cannot be undone.
5. Confirm and Send
After reviewing the details, click on the “Confirm” or “Send” button to initiate the transaction. The Galxe Wallet app will process the transaction and send the specified amount of cryptocurrency to the recipient’s wallet address.
It’s important to note that transactions using the Galxe Wallet app may take some time to be confirmed on the blockchain, depending on the network congestion and transaction fees you have set.
Additionally, it’s always recommended to keep your Galxe Wallet app and devices secure. Enable additional security features like two-factor authentication to protect your funds.
With these simple steps, you can easily use the Galxe Wallet app for transactions and securely manage your cryptocurrency holdings.
Question-answer:
What is the Galxe Wallet app?
The Galxe Wallet app is a mobile application that allows you to store, send, and receive cryptocurrencies.
How do I set up the Galxe Wallet app?
To set up the Galxe Wallet app, you need to download it from the App Store or Google Play Store, create an account, and follow the on-screen prompts to set up your wallet.
Can I use Galxe Wallet on multiple devices?
Yes, you can use Galxe Wallet on multiple devices as long as you sign in with the same account.
What cryptocurrencies can I store in Galxe Wallet?
Galxe Wallet supports a wide range of cryptocurrencies, including Bitcoin, Ethereum, Litecoin, and more. You can check the full list of supported coins in the app.
Is Galxe Wallet secure?
Yes, Galxe Wallet uses advanced security measures to protect your funds, such as two-factor authentication and encryption. However, it’s always recommended to take additional security measures, such as enabling a passcode lock on your device.