Welcome to our comprehensive tutorial on how to add APTOS/SOLANA/SEI/INJECTIVE/FLOW/STARKNET Wallet to Galxe ID! In this tutorial, we will guide you through the step-by-step process of adding these popular wallets to Galxe ID, along with detailed screenshots to help you along the way. Whether you’re a newcomer to the world of cryptocurrency or an experienced user, this tutorial is perfect for anyone looking to integrate their APTOS/SOLANA/SEI/INJECTIVE/FLOW/STARKNET Wallet with Galxe ID.
Galxe ID is a cutting-edge platform that allows users to manage multiple wallets in one place. By integrating your APTOS/SOLANA/SEI/INJECTIVE/FLOW/STARKNET Wallet with Galxe ID, you can access and manage your digital assets with ease. This tutorial will cover the entire process from start to finish, ensuring that you have a seamless experience while adding your wallet to Galxe ID.
The process of adding your APTOS/SOLANA/SEI/INJECTIVE/FLOW/STARKNET Wallet to Galxe ID is straightforward, but it’s essential to follow the steps correctly. By the end of this tutorial, you’ll have your wallet integrated with Galxe ID and be ready to manage your assets with ease. So, let’s dive in and get started!
Disclaimer: Before we begin, please note that while Galxe ID makes every effort to ensure the security of your assets, it’s always important to exercise caution when interacting with wallets and digital assets. Please exercise due diligence and do your own research before proceeding with any financial transactions.
Now that we’ve covered the necessary precautions, let’s move on to the first step in adding your APTOS/SOLANA/SEI/INJECTIVE/FLOW/STARKNET Wallet to Galxe ID.
Add APTOS Wallet to Galxe ID Tutorial
Are you a user of Galxe ID who is interested in adding the APTOS wallet to your account? This comprehensive tutorial will guide you through the process step by step, making it easy for you to integrate your APTOS wallet with Galxe ID. Let’s get started!
Step 1: Accessing Your Galxe ID Account

To begin, open your preferred web browser and navigate to the Galxe ID website. If you don’t have an account yet, you will need to create one. Once logged in, you will be directed to your account dashboard.
Step 2: Navigating to Wallet Settings
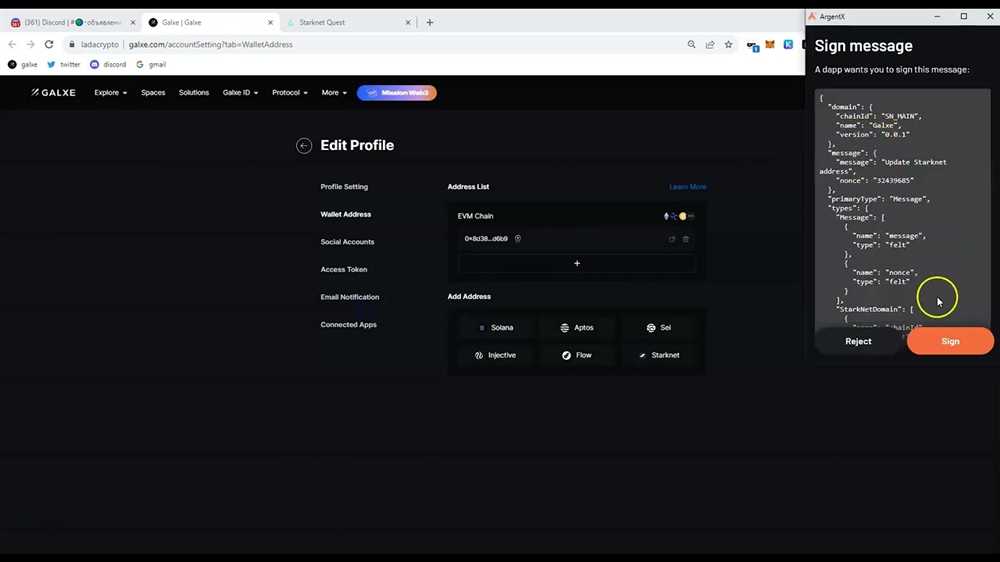
In the account dashboard, locate the navigation menu on the left-hand side. Scroll down and click on “Wallet Settings.” This will take you to the page where you can manage your connected wallets.
Step 3: Adding the APTOS Wallet

In the Wallet Settings page, you will see a list of supported wallets. Look for the APTOS wallet option and click on the “Add Wallet” button next to it.
Note: If you don’t see the APTOS wallet option, make sure it is supported by Galxe ID. You can also reach out to their customer support for assistance.
After clicking the “Add Wallet” button, a pop-up window will appear. Here, you will be prompted to enter your APTOS wallet address. Copy and paste your wallet address into the designated field and click on the “Add” button.
Step 4: Verifying Your APTOS Wallet
Galxe ID will now verify your APTOS wallet address. This process may take a few minutes. Once verified, you will receive a confirmation message stating that your APTOS wallet has been successfully added to your Galxe ID account.
That’s it! You have now added your APTOS wallet to Galxe ID. You can now securely manage your APTOS funds and perform transactions through the Galxe ID platform.
Important: Always ensure that you keep your APTOS wallet information and Galxe ID login credentials safe and secure. Regularly update your passwords and enable additional security measures to protect your assets.
Disclaimer: This tutorial is provided for informational purposes only. Always exercise caution and double-check the instructions provided by Galxe ID when performing actions on your account.
Step 1: Downloading and installing APTOS wallet
The first step in adding the APTOS wallet to Galxe ID is to download and install the APTOS wallet. Follow the steps below to get started:
- Go to the official APTOS website at https://aptos.io.
- Click on the “Download” button located on the homepage.
- Select your operating system from the options provided (Windows, macOS, Linux).
- Once the download is complete, locate the installation file and double-click it to begin the installation process.
- Follow the on-screen instructions to install the APTOS wallet on your computer.
- Once the installation is complete, launch the APTOS wallet application.
Now that you have successfully downloaded and installed the APTOS wallet, you can proceed to the next step of adding it to Galxe ID.
Step 2: Creating an account on Galxe ID
To interact with APTOS/SOLANA/SEI/INJECTIVE/FLOW/STARKNET wallets through Galxe ID, you will need to create an account on Galxe ID first. Here’s how you can do it:
1. Visit the Galxe ID website
Open your preferred web browser and navigate to the Galxe ID website by entering https://galxe.com in the address bar.
2. Click on “Sign Up”
Once you are on the Galxe ID homepage, locate the “Sign Up” button and click on it. This will take you to the account creation page.
3. Enter your information
On the account creation page, you will see a form that asks for your personal information. Fill in the required fields with your name, email address, and a strong password. Make sure to choose a secure password that includes a combination of uppercase and lowercase letters, numbers, and special characters.
4. Verify your email address
After entering your information, click on the “Sign Up” button. Galxe ID will send a verification email to the email address you provided. Go to your email inbox and click on the verification link provided in the email to verify your email address.
5. Set up two-factor authentication (optional)

Once your email address is verified, you will have the option to set up two-factor authentication (2FA) for added security. We highly recommend enabling 2FA to protect your Galxe ID account.
6. Complete the registration process
After setting up 2FA (or skipping it if you chose not to enable it), you will be prompted to accept the terms and conditions of Galxe ID. Review the terms and conditions and click on the “Accept” button to complete the registration process.
Congratulations! You have successfully created an account on Galxe ID. Now you can proceed to connect your APTOS/SOLANA/SEI/INJECTIVE/FLOW/STARKNET wallets to Galxe ID and access their features and functionalities.
Step 3: Adding APTOS to Galxe ID
Once you have successfully created your Galxe ID and set up your wallet, the next step is to add the APTOS token to your Galxe ID.
Follow the steps below to complete this process:
- Open your Galxe ID and navigate to the “Wallet” section.
- Click on the “Add Token” button.
- In the search bar, enter “APTOS” and click on the token once it appears in the search results.
- Review the details of the APTOS token and click on the “Add” button to proceed.
- Confirm the transaction by entering your wallet password.
- Wait for the transaction to be processed and for the APTOS token to be added to your Galxe ID wallet.
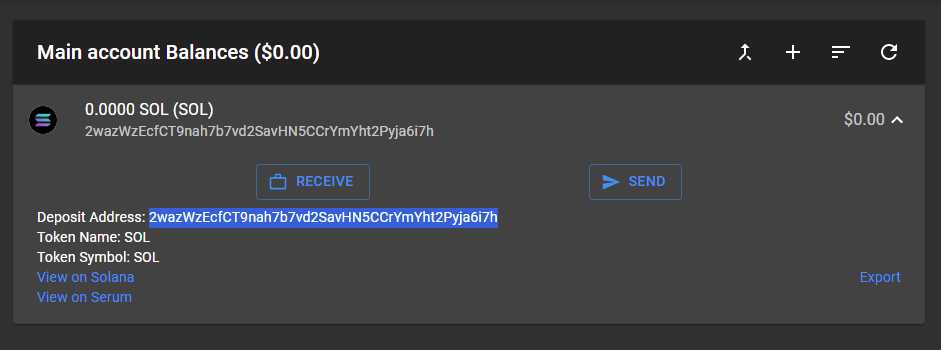
Once the APTOS token has been added to your Galxe ID, you will be able to view your APTOS balance and perform transactions using this token.
Note: Make sure to double-check the token details before adding it to your Galxe ID to ensure that you are adding the correct token.
Remember to keep your Galxe ID secure and never share your wallet password with anyone.
Question-answer:
What is Galxe ID?
Galxe ID is a decentralized identity solution that allows users to securely store and manage their digital identities on the blockchain.
How do I add a wallet to Galxe ID?
To add a wallet to Galxe ID, you need to follow a comprehensive tutorial with screenshots. The tutorial will guide you through the process of adding APTOS/SOLANA/SEI/INJECTIVE/FLOW/STARKNET wallet to your Galxe ID step by step.