Have you decided to delete your EVM wallet in Galxe ID? Whether you’re transitioning to a different wallet or simply no longer need it, it’s important to know how to properly delete your wallet to ensure your digital assets are secure. Deleting your EVM wallet requires a few simple steps, but it’s important to follow them carefully to avoid any potential pitfalls.
Step 1: Backup your wallet
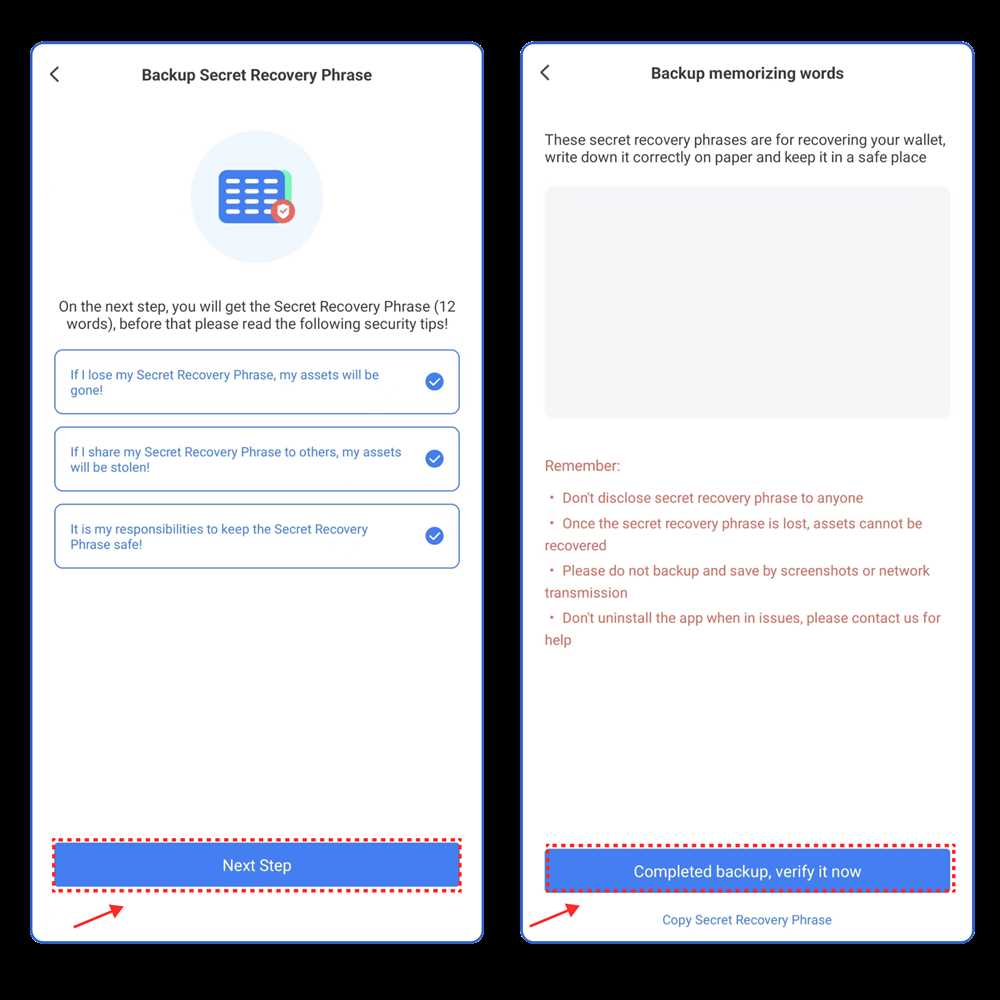
Before proceeding with deleting your EVM wallet, it’s crucial to back up your wallet data. This ensures that you don’t lose any important information or access to your digital assets. Make sure to securely store your backup in a separate location, such as a USB drive or external hard drive.
Step 2: Transfer your funds
To ensure the safety of your digital assets, it’s important to transfer your funds from your EVM wallet to another secure wallet or exchange. This step ensures that you don’t lose access to your funds during the deletion process. Take your time to carefully select a new wallet or exchange that suits your needs and offers robust security measures.
Step 3: Disconnect any connected services
If you have connected any services or applications to your EVM wallet, such as dApps or decentralized exchanges, make sure to disconnect them before proceeding with the deletion process. This prevents any potential complications or security risks that may arise from the disconnection of your wallet.
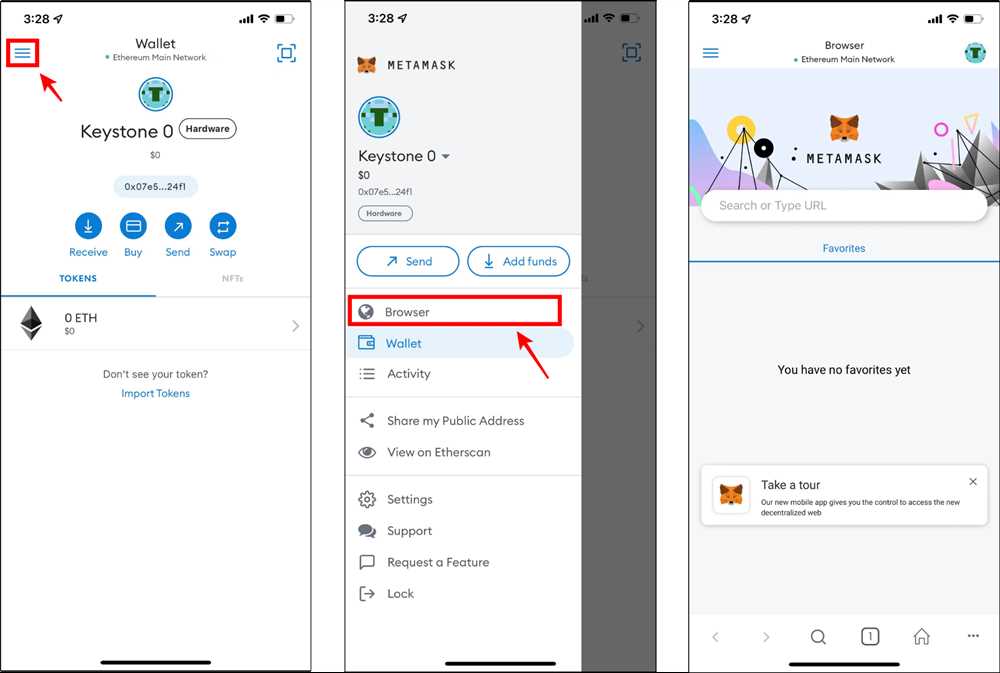
Step 4: Access the Galxe ID platform
To delete your EVM wallet, access the Galxe ID platform using your login credentials. Once logged in, navigate to the wallet settings or preferences section to find the option to delete your wallet. Make sure to read any instructions or warnings provided by the platform before proceeding.
Step 5: Delete your EVM wallet
Follow the instructions provided by the Galxe ID platform to delete your EVM wallet. This process typically involves confirming your intention to delete the wallet and entering any necessary security verification measures, such as passwords or two-factor authentication codes. Take your time to ensure that you are deleting the correct wallet and that you have transferred your funds to a secure location.
Step 6: Verify deletion
Once you have completed the deletion process, double-check to ensure that your EVM wallet has been successfully deleted. Verify that you no longer have access to the wallet and that your digital assets have been securely transferred to your new wallet or exchange. Keep a record of these verification steps for future reference, if necessary.
By following these step-by-step instructions, you can securely delete your EVM wallet in Galxe ID, ensuring the safety of your digital assets and maintaining control over your financial information. Remember to always exercise caution when dealing with digital wallets and to keep your backup information secure.
Why You Should Delete Your EVM Wallet in Galxe ID
Deleting your EVM wallet in Galxe ID is an important step to take in ensuring the security of your digital assets. Here are a few reasons why you should consider deleting your wallet:
1. Protect Your Funds
By deleting your EVM wallet, you eliminate the risk of unauthorized access to your funds. In the unfortunate event that your wallet is compromised or stolen, deleting it ensures that no one else can access your assets.
2. Prevent Fraudulent Activities
Deleting your EVM wallet in Galxe ID can protect you from falling victim to fraudulent activities. Hackers and scammers are constantly looking for ways to steal digital assets, and by removing your wallet, you minimize the chances of becoming a target.
Additionally, if you no longer need your EVM wallet or have switched to a different wallet provider, deleting your Galxe ID wallet ensures that you won’t accidentally perform transactions or interact with potentially malicious applications.
Overall, deleting your EVM wallet in Galxe ID is a proactive step to safeguard your funds and protect yourself from potential threats. It is important to exercise caution and regularly review your wallet security practices to ensure the safety of your digital assets.
Step-by-Step Guide
Deleting your EVM wallet in Galxe ID is a straightforward process that can be easily done by following these steps:
1. Launch the Galxe ID application on your device.
2. Once the application is open, navigate to the settings menu. This can usually be found by tapping on the menu icon in the top right corner of the screen.
3. Within the settings menu, locate the option for managing wallets. This option may be labeled differently depending on the version of Galxe ID you are using, but it should be fairly easy to identify. Tap on this option to proceed.
4. After selecting the wallet management option, a list of your current wallets will be displayed. Find the EVM wallet that you want to delete and tap on it.
5. Within the EVM wallet settings, look for the option to delete the wallet. This option may be located at the bottom of the screen or within a sub-menu. Tap on the delete option to confirm that you want to delete the wallet.
6. A confirmation prompt will appear asking you to confirm the deletion. Read the prompt carefully and make sure you understand the consequences of deleting the wallet. If you are certain that you want to proceed, tap on the confirm button.
7. After confirming the deletion, the EVM wallet will be permanently removed from your Galxe ID application. Any funds or assets associated with the wallet will also be lost, so make sure to transfer or backup any important information before deleting the wallet.
Following these steps will ensure that your EVM wallet is successfully deleted from your Galxe ID application.
Things to Consider Before Deleting Your EVM Wallet
Before you delete your EVM wallet in Galxe ID, there are a few important things to consider. By deleting your wallet, you will permanently lose access to any funds and data associated with it. It is crucial to ensure that you have taken all necessary precautions to protect your assets and information.
1. Backup Your Wallet

Prior to deleting your EVM wallet, it is essential to create a backup. This backup will serve as a protection against any unforeseen circumstances, such as loss or theft of your device. Make sure to store the backup in a secure location, preferably offline, such as a hardware wallet or a password-protected USB drive.
2. Transfer Your Funds
Before deleting your EVM wallet, make sure to transfer any remaining funds to another secure wallet. This ensures that you can still access and manage your assets, even after deleting your wallet in Galxe ID. Double-check the destination wallet address to ensure accuracy and avoid any loss of funds.
| Important Considerations: |
|---|
|
By considering these factors before deleting your EVM wallet, you can ensure that you are well-prepared and can confidently proceed with the deletion process.
Question-answer:
What is EVM Wallet in Galxe ID?
EVM Wallet in Galxe ID is a digital wallet that allows you to store and manage your Ethereum Virtual Machine (EVM) tokens. It provides a convenient and secure way to store your cryptocurrencies and make transactions on the Ethereum network.
Why would someone want to delete their EVM Wallet in Galxe ID?
There could be several reasons why someone would want to delete their EVM Wallet in Galxe ID. They might have switched to a different wallet provider, no longer want to use the wallet, or want to create a new wallet with a different address.